Sometimes it seems like breastfeeding is a sport. It requires concentration, endurance, a balanced diet, practice, patience, and sheer determination.
The more you do it, the more weight you lose. (insert thumbs up emoji)
The more you do it, the more you are prone to injury. (insert thumbs down emoji)
Breastfeeding can cause back pain, neck pain, shoulder pain, and wrist pain. Each pain condition is directly related to posturing while nursing. The good news is, posture can be easily adjusted to reduce the risk of pain associated with breastfeeding.
In this post, I will discuss the most common breastfeeding positions and talk about how they can cause pain and what you can do to prevent the pain.
The key to good breastfeeding posture is taking the time to prepare for the nursing session. Your baby might be screaming his precious little head off, but take 5 extra seconds to think through your position and set up before latching on the starving little babe.
CRADLE HOLD
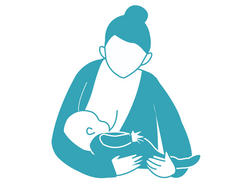
I’ve never personally done this position because…ouch. Seton was born at a whopping 8 pounds, 10 ounces and (obviously) has only been getting bigger. I was NOT ABOUT to hold that weight in the crook of my elbow for 15+ minutes at a time. In the picture above, one can see the weight of the baby will pull the entire right shoulder blade forward which subsequently rounds out the upper back.
This picture also shows the mother tenderly looking down at her child. Let’s all let out a group sigh…”awwww”… and then let’s never do that. Looking down at your infant for the duration of the feeding causes the muscles on the back of your neck to work really hard for a really long time in a really elongated position. Really. And that’s a workout those muscles just don’t need. (did I say “really” enough to make my point?)
A better option is to place the infant on a stack of pillows (and/or a boppy) to take the pressure off the supporting arm and shoulder. Once the baby is latched, keep your neck tall and look forward. Alright, you can peak at the cutie pie once in a while.
To prevent lower back pain, make sure your feet are supported and not just dangling from the couch or rocking chair. Sit evenly on your buttocks. If you have one foot tucked under your hips, your back is in a bent and rotated position that can cause pain.
THE CROSS OVER HOLD

This is similar to the cradle hold, but the position of the arms are switched. For this position, I suggest to make all the changes recommended above.
These two positions put an enormous amount of pressure on the arms and pull your upper back forward. Unless you’re going for the hunchback look, USE PILLOWS to support the baby!
Also make sure your back is fully supported. In some chairs your feet may not reach the floor if your back is supported on the back of the chair. In this case, you may need to use pillows behind your back to support your back and allow your feet to touch the floor.
THE CLUTCH OR FOOTBALL HOLD
This position is great for so many mothers including those with large breasts, those with twins, and those who have had a Cesarean section.
As you may have guessed, I recommend placing the infant on pillows so you take out the work your arm would have to do. Sit with your back supported so that the arm that is guiding the infant’s head does not have the tendency to pull your shoulder girdle forward and cause your back to round out. As always, once the infant is latched, keep your head up and look forward. Your feet should be supported.
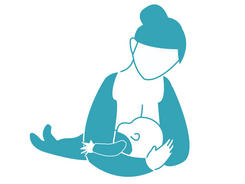
THE RECLINING POSITION
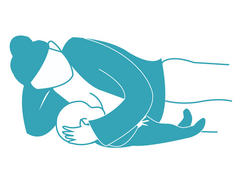
Great was the day that I mastered this position because it meant I did not have to sit on my postpartum bum. (TMI?) This is also a great position if you have low back pain. Just remember to support your head with pillows so your neck is in a neutral position. I’ll take this moment to refer to my post on the Ergonomics of Sleep where I mention the importance of keeping your neck in a neutral position while laying down. Don’t prop your head up with your hand like the ever-so-informative cartoon shows above.
To summarize the dos and don’ts of breastfeeding:
DON’T support the weight of the baby with your arms.
DO rest the infant on pillows and/or a boppy (I use a boppy and pillows galore and have remained pain free).
DON’T look down at your baby for the duration of the feeding…(or your Kindle, Nook, or iPad…)
DO keep your neck in a neutral position.
DON’T allow legs to dangle or be crossed under your booty.
DO make sure feet are flat on ground or stool to take pressure off the low back.
Happy nursing and feel free to message me with any questions!